This tutorial explains how you can create your own simple city training map for use in Catching Features.
For this tutorial you'll need the following:
* A version of OCAD. A fully-functional demo version is available from www.ocad.com
* A version of SketchUp. A fully-functional demo version is available from www.sketchup.com
* The OCAD template for sprint-O maps. If it's not on your OCAD installation, you can download it from the IOF Map Commission at http://lazarus.elte.hu/mc/index.html
1. First create the OCAD file based on the sprint-O template. We'll keep this example very simple, only ground and 5 buildings on totally flat ground.
Here's what it look like in OCAD. I've created this example in 1:4000 and set every line in the grid to be 100 meters (so the whole map area is 300*300 meters).
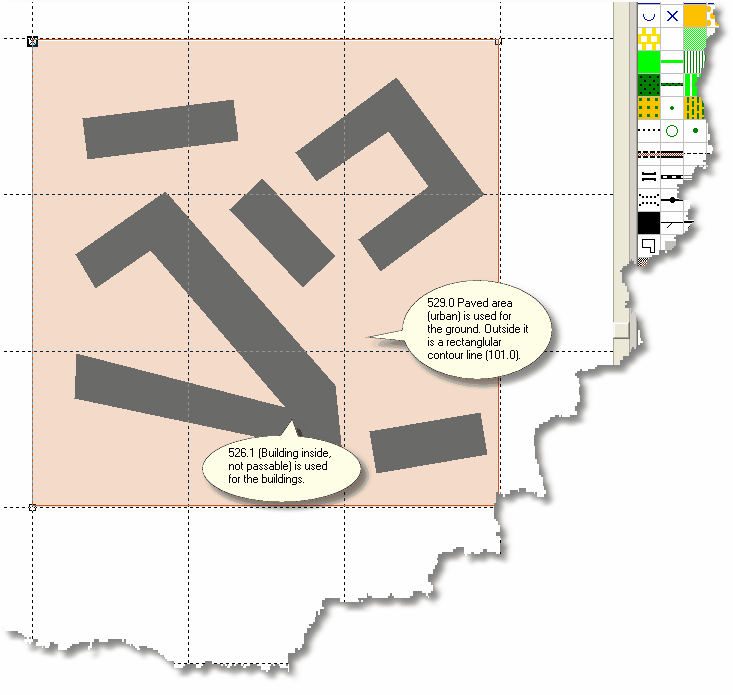
It's important that all buildings are closed. Also, make sure to put a rectangular contour line around the whole map area.
2. Save the OCAD file. It will later be imported to CF Edit.
3. Selected the symbol for buildings in OCAD (in this case it's the 526.1 symbol) and then select File/Export/DXF.... Make sure GIS (1 meter/unit) is selected on the export screen and also Only objects with chosen symbol(s). Save the DXF file with a descriptive file name. Now all the buildings will be saved as a DXF image file that we'll take to SketchUp.
4. Now start SketchUp. Select File/Import/3D Model... Push the Options... button and select Meters. Import the model file.
5. To see the imported buildings you might now need to zoom out.
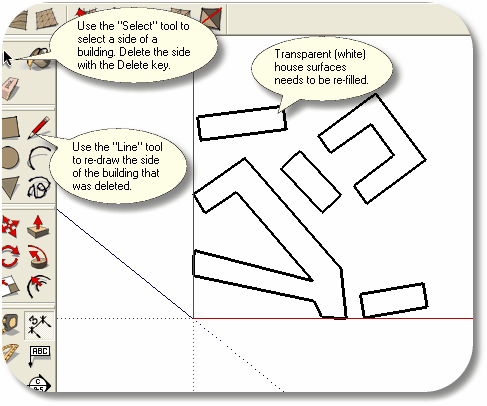
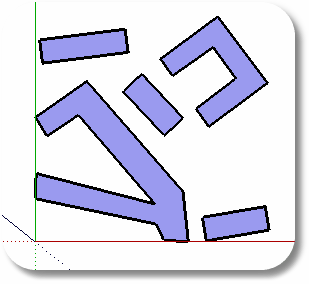
6. If the buildings are hollow they need to be re-filled by deleting one on the sides (use the Select tool, select the side and press the Delete key) of each building and refill that side using the Line tool. After that, the buildings should appear as blue surfaces:
7. Now lift all the buildings by using the Push/Pull tool. To get a more varied look, use different heights of the houses but try to keep it at something like 7 meters or more.

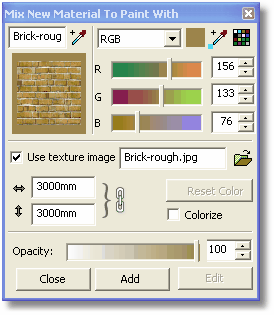
8. Now it's time to add a material to the houses. Select the Paint Bucket tool and create a material that you paint all the houses with. Select a material (a material with the same width and height works the best), press the Create button and set the dimensions to 3000mm for both width and height. This will make the texture big enough to be seen when running in the city.
Then press Add and Close. The material should now appear in the In Model section of the Materials window.
(Since CF Edit can't yet handle multiple textures from a 3DS you don't need to be too concerned about what material you use in SketchUp. The important thing is that you set the dimensions of the material.)
9. Now paint all building with the material: Press Ctrl+A to select all buildings and click with the bucket at any of the houses. The buildings should now have been painted with the new material.
10. Export to a 3DS file by selecting File/Export/3D Model... and 3DS as Export Type. Press the Options... button to open the 3DS Export Options dialog box. Make sure the Export Texture Maps is checked, and the Preserving texture coordinates is selected and also that Meters is selected as the Unit. Export to a file name.
11. You can save the SketchUp model if you want to as well. Then quit SketchUp.
12. Open CF Edit and import the OCAD file. At contour conversion, just set the rectangular contour line to any value (such as 5 for example) so you get a flat surface. Make sure all open areas are converted correctly.
13. Now create and place the map chunks for your map so they appear correctly in CF Edit when you select Map/Show Map 25% or Map/Show Map 50%. When this has been achieved, import the 3DS file with all the buildings and align them perfectly with the map and with the ground level (you might need to lift the buildings up a bit).
Now you have your own city map!
Here's how the end result might look in CF Edit:

A good thing about the 3DS that was exported from SketchUp is that the texture coordinates for all the houses are there. So if you now want to change texture for some of the houses you can do that (with Edit/Change texture of Selected Tris) as long as the new texture bitmap has the same x/y ratio.
Good luck with your city!